
Email How-To FAQ
Questions
- 1. How do I send very large files via email?
- 2. How do I share large files via OneDrive?
- 3. Grant Delegate Rights
- 4. Share Calendar
- 5. How to edit a Distribution List (you must be an owner)
- 6. Requesting administrative mailbox rights
- 7. Delete Cached/Stored Email Address from Auto-Complete
- 8. Check for Stored Passwords
- 9. Download Global Address List (GAL)
- 10. Secure Email
- 11. Setup Email on Mobile Device (State or Personal)
- 12. Changing Address Book Default Display in Outlook 2016
- 13. How to Shut Off Cache Mode for Secondary Mailboxes/Shared Folders (Uncheck Download Shared Folders)
- 14. Outlook Web Access (OWA)/Webmail
- 15. Create/recreate Outlook profile
- 16. Create a signature in Outlook
- 17. Sharing an Outlook Folder
- 18. Grant Delegate Ability to Schedule Webex Meetings
- 19. How to Reset your Password
- 20. How to Change your Contact Information in the Global Address Book
Email isn't meant to be used to send, receive or store very large attachments. There are other tools available better suited and storing files. OneDrive has an easy to use File Sharing option. See #2 for Steps to learn how.
Similar to having an assistant that helps you manage your incoming paper mail, another person, known as a delegate, can receive and respond to email messages and meeting requests and responses on your behalf. You can also grant the delegate additional permissions to read, create, or change items in your mailbox.
Delegate Access goes beyond just sharing access to your folders. Delegates are granted additional permissions, such as creating email messages or responding to meeting requests on your behalf.
As the person granting permission, you determine the level of access that the delegate has to your folders. You can grant a delegate permission to read items in your folders or to read, create, change, and delete items. By default, when you add a delegate, the delegate has full access to your Calendar and Tasks folders. The delegate can also respond to meeting requests on your behalf.
What are the delegate permission levels?
- Reviewer - Delegate can read items in your folders.
- Author - Delegate can read, create, change, and delete items that they create.
For example, a delegate can create task requests and meeting requests directly in your Tasks or Calendar folder and then send the item on your behalf. - Editor - Delegate can do everything that an Author has permission to do and additionally can change and delete the items you created.
A delegate automatically receives Send on Behalf permissions. By default, the delegate can read only your meeting requests and responses. The delegate isn't granted permission to read other messages in your Inbox.
To add a Delegate follow these steps:
- Click the File tab.
- Click Account Settings, and then click Delegate Access.
- Click Add.
- Find the person whom you want to designate as your delegate from the Global Address Book.
- Click Add, and then click OK.
- In the Delegate Permissions dialog box, accept the default permission settings or select custom access levels for Exchange folders.
If a delegate needs permission to work only with meeting requests and responses, the default permission settings, such as Delegate receives copies of meeting-related messages sent to me, are sufficient. You can leave the Inbox permission setting at None. Meeting requests and responses will go directly to the delegate's Inbox.
Note: By default, the delegate is granted Editor (can read, create, and modify items) permission to your Calendar folder. When the delegate responds to a meeting on your behalf, it is automatically added to your Calendar folder. - To send a message to notify the delegate of the changed permissions, select the Automatically send a message to delegate summarizing these permissions check box.
- If you want, select the Delegate can see my private items check box.
Important: This setting affects all Exchange folders. This includes all Mail, Contacts, Calendar, Tasks, Notes, and Journal folders. There is no way to grant access to private items in only specified folders. - Click OK.
Note: Messages sent with Send on Behalf permissions include both the delegate's and your name next to From.
- Right click on the calendar you need to share
- Click Properties
- Click the Permissions tab
- Click the Add button
- Type in the user's name you'd like to share calendar to
- Then grant appropriate permissions using Permission Level drop down
When complete, the other person can add the calendar to their Outlook * Right Click on My Calendar
Select Add from Address Book
- Select User from Adress Book you've been grand rights to
- Shared Calendar will appear in Outlook
- Open the Address Book
- Find the Distribution List you're the owner of.
- Right click on the list and select Properties
- Click on Modify Members
- Add/Remove accordingly.
To gain access to a generic mailbox or another user's mailbox an ROD must be submitted. If needed, you must specify Send As or Send on Behalf permissions. If the ticket does not specify which Sending rights are needed, no sending rights will be granted. If later, it is decided Send rights are required, another ROD will need to be entered.
Note: PIM can only provide Full rights to mailboxes.
Send on Behalf – User A has been provided Send on Behalf for User B; this allows User A to send email as User B and the recipient(s) of the email will see User A sent on User B;s behalf. The Sent email will reside in User A's sent items.
Recipient will see "From: User A on Behalf of User B"
Send As - User A has been provided Send As for User B; this allows User A to send email fully as though it came from User B, the recipient(s) do not see anything about User A. If the recipient replies it will go to User B mailbox. The Sent email will reside in User A's sent items.
Note: Send As or Send on Behalf can be provided without providing the User any access to the other user's mailbox.
- Open a new message…start typing the name you want deleted in the TO line.
- When the email address pops up, click the X to the right of the name you want deleted.
- If you want to add it back correctly, you'll need to:
a. Reselect the name from the address book under and send a new message
b. Now the corrected entry will reside in your stored addresses
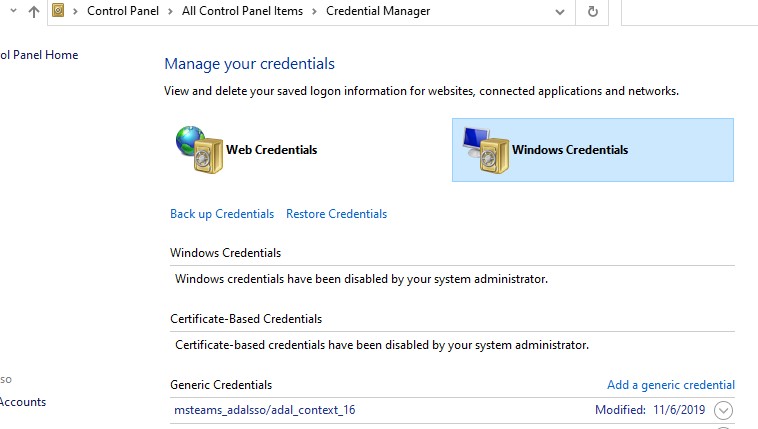
- Go to *Control Panel *
If there are stored passwords they will show in this screen and can be removed by clicking the stored credential and clicking remove from vault. Be sure you check Windows Credentials as well as* Web Credentials*
Delete Google Chrome Stored Passwords

- Click the Chrome menu at the top right of the browser toolbar.
Select Settings
- Scroll down to Autofill
- Click Passwords to see a list of all the usernames and passwords that have been saved
Click the to the right of the password you'd like to remove
Click Remove
1. Click the Send/Receive Tab
2. Click Send/Receive Groups
3. Click Download Address book
DoIT Secure Messaging
DoIT secure messaging only applies to OUTBOUND email messages sent from our illinois.gov email accounts. Our system uses TLS (Transfer Layer Security) for secure messaging, to ensure it's encrypted during transmission. We also have access to another service called CRES (Cisco Registered Envelope Service.) The only difference between TLS and CRES is that CRES forces the recipient to go thru more steps to read the email.
TLS (Transfer Layer Security)
Our system always uses TLS for outgoing messages, but if you want to be sure that you're sending a secure message via our TLS, you should put the #secure# in the subject line and it also will serve as a notice to the recipient that the email contains confidential or sensitive information. The email will be encrypted during transmission, but the user won't have to take any special steps to reach the email once it reaches their Inbox.
TLS will search all email sent for SSN patterns within the content and most attachment types. If a SSN pattern is found, it will be processed using #secure#. The four SSN patterns to be searched are:
###-##-####, ###,##,####, ###.##.#### and ### ## ####.
CRES (Cisco Registered Envelope Service)
If you include any of the options listed below, in the subject line of an outgoing email, the recipient will be forced to obtain a key to login and receive the email. The following options all implement the CRES service, but we have created multiple options to assist in notifying the recipient of the different types of data included in the email. Adding these options, the message will be using TLS and add another feature called CRES (Cisco Registered Envelope Service.)
- #ilencrypt# -- generic
- #ILConfidential# -- confidential
- #ILPrivate# -- private
- #ILSensitive" -- sensitive
- #ILPII# -- personally identifiable information
- #ILPHI# -- protected health information
- #ILFTI# -- federal tax information
- #ILPCI# -- payment card information
- #ILCJI# -- criminal justice information
The way Secure Mail/CRES with #options# works:
- Send a message to external recipient with #IlEncrypt# in the subject
- The appliance encrypts the message and forwards the message to the recipient's email account via TLS.
- The message in the recipient's inbox informs them the message has been crypted and contains an attachment.
- The attachment is the actual encrypted message
- In order to open the encrypted attachment, the recipient has to verify their credentials with CRES.
- The message doesn't reside on a Cisco On Prem appliance or cloud service, but within the recipients mailbox. The keys to open the message are stored within the CRES.
This service is a standard feature of our Enterprise email service. For additional details and FAQ regarding the Secure Web Delivery service, please visit the DoITService Catalog.
Contact your Agency Telecom Coordinator to get the process started.
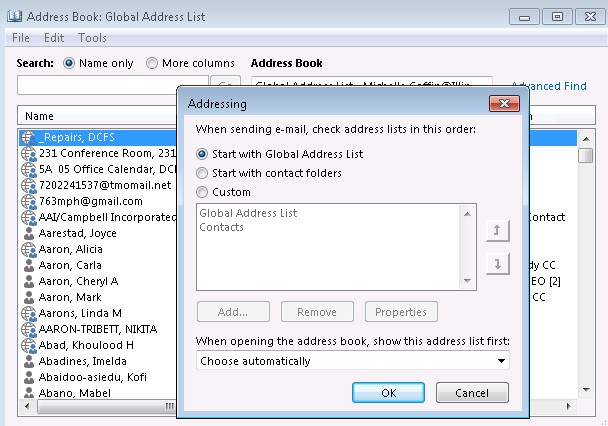
Click on Address Book in the ribbon OR do a *Ctrl+Shift+B *(Both will bring up the Address Book)

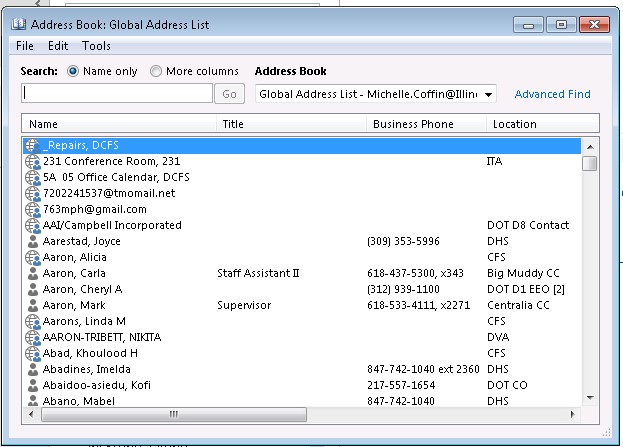
Click on Tools
Here is where you can change how you want the Address Book to behave.
Click OK when change is complete
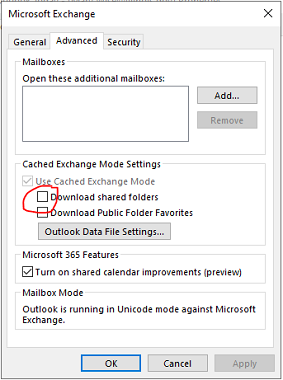
Shutting off cache mode for shared mailboxes will speed up Outlook as well as eliminate issues such as folders not syncing or not seeing calendar appointments of other mailboxes.
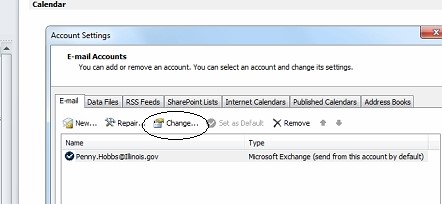
Go to Account Properties – click on File – Account Settings – Account Settings.
- Click Change
- Click on More Settings
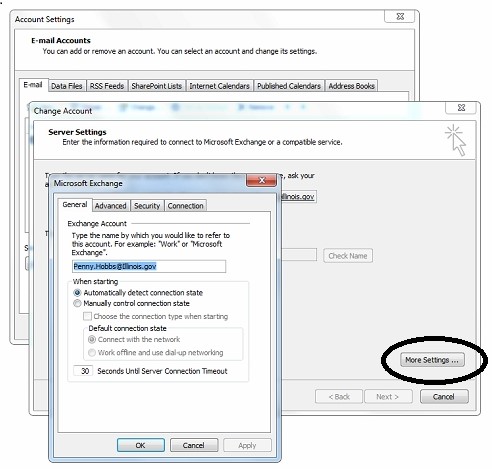
- Click on the Advanced Tab
- Uncheck Download Shared Folders
- Click OK
- Close out Outlook and reopen it
- All secondary mailboxes will be status Online rather than Connected to Microsoft Exchange
All Illinois.gov users (except Revenue and DOC staff) can access email from a web browser.
- Type the following into the browsers address bar: outlook.office365.com
- Type in full email address: First.Last@illinois.gov
- Click Next
- Type in your Network Login Password
- Next you'll need to authenticate using MFA using the method you setup
- If you haven't setup a method yet you won't be able to access webmail outside the State network. Please follow the MFA Instructions to configure your MFA methods.
- Click Verify to finish logging in
NOTE: Revenue and DOC staff can request access through IT/LAN Coordinators
- Go to the Control Panel from the Start Menu
- Double click on the Mail (32 bit) icon
- Click the Show Profiles…button
- Click Add
- In the Profile Name type in: Default Outlook Profile
- Click OK
- Make sure the user's email address populates in the box: First.Last@Illinois.gov
- Click Next
- Click Change Account Settings check box in bottom left corner of screen
- Click Next
- Click More Settings…button in bottom right corner
- Click Advanced Tab
- Uncheck Download shared folders in the middle of the page
- Click Ok
- Click Finish
- Select Default Outlook Profile under settings for Always use this profile
- Click Ok
- Go to Options, then Mail, then click on Signatures
- Under Choose default signature, in the E-mail account list, click an e-mail account with which you want to associate the signature
In the New messages list, select the signature that you want

If you want a signature to be included in message replies and in forwarded messages, in the Replies/forwards list, select the signature. If not, select none
Click OK
IMPORTANT NOTE: To share a folder in Outlook, you must go through multiple levels of setting up permissions. Permissions need to be set up at the Mailbox Root (email address – folder permissions), and then rights granted in each folder in the hierarchy along with the actual *subfolder *the user needs rights to.
- Right click on the folder to be shared.
- Click on Properties
- Click on the Permissions Tab
- Click *Add *and search the Address Book for the person you would like to share the folder to
- Double Click on the person Click OK
- Change the permission level to a pre-determined permission level or select the check boxes underneath Read/Write/Delete Items/Other (based on the access the user needs). Make sure the folder visible box is checked.
- Click Apply *and *Ok In this example, PIM is a sub-folder of Inbox. The Inbox also needs to be shared so that the PIM folder can be viewed* 1. *To Share the Inbox folder:
- Right click on the folder, Click Properties, Click Permissions *tab, Click *Add, Select the user, Set the permission level to *NONE *and make sure the Folder Visible is checked.
Click *Apply *and **Ok NOTE**: If you select a different permission level than NONE, you are giving the user access to see everything in the Inbox folder.
The final folder to share is the Mailbox Root (email address at the top)
Right click on the folder, Click Properties, Click Permissions *tab, Click *Add, Select the user, Set the permission level to *NONE *and make sure the Folder Visible is checked.
- Click *Apply *and **Ok NOTE**: If you select a different permission level than NONE, you are giving the user access to see everything in the Inbox folder. Shut off cache mode for shared mailboxes. It will still search the shared mailboxes. Uncheck Download shared folders

If it still has issues delete the Index and rebuild a new one:
Open Indexing Options (Click Start and in the search box type Index; Indexing Options will be displayed)
- Select "Microsoft Outlook (Illinois\user.name)"
- Click modify
- Unselect "Microsoft Outlook (Illinois\user.name)"
- REBOOT (important)
- Follow steps 1-3 above to get into Index Options but this time reselect "Microsoft Outlook (Illinois\user.name)"
- Click OK to save your changes.
- Once this change is made it will take a while to rebuild the index but once it's complete your search problems should be resolved. a. You can monitor the status of the index rebuild by selecting Index Options (status will be at the top of the window)
Besides Outlook Delegate access user might need rights to schedule WebEx meetings.
- Sign-in to illinois.webex.com
- Click Preferences on the left hand side.
- Click Scheduling in the middle of the page.
- Add user's email address to the Scheduling permission box and click Save.
Reset your password without needing to call the IT Service Desk by registering for Microsoft Identity Management (MIM)
https://www.partner.illinois.gov
- Click Modify Profile
- Click on Edit Account
- Make changes wanted
- Enter Password at bottom
- Click Save
- Changes will appear in the Global Address Book the following day